
구성정보 파일로 application.yml 파일을 사용했었는데 내용이 변경된다고 하면 어플리케이션 자체가 다시 빌드되고 배포해야 된다. 이 부분을 개선하기 위해서 어플리케이션 내부에 구성 파일을 가지고 있는 것이 아니라 외부에서 관리할 수 있도록 한다. -> 자유도, 동적
구성파일을 관리하기 위해 FTP, 네트워크 파일 시스템, 로컬 파일 시스템, Git Repository가 사용될 수 있다.
Spring Boot Actuator를 이용해서 가지고 있는 구성정보 파일을 확인한다.
구성 정보 파일을 하나만 만드는 것이 아니라 개발, 테스트, 운영되는 실제 단계에 맞춰서 사용할 수 있는데 이것을 Profiles이라고 한다.
Spring Cloud Config
- 분산 시스템에서 서버, 클라이언트 구성에 필요한 설정(application.yml)를 외부 시스템에서 관리
- 하나의 중앙화 된 저장소에서 구성요소 관리 가능 (일괄적으로 관리)
- 각 서비스를 다시 빌드하지 않고, 바로 적응 가능
- 어플리케이션 배포 파이프라인을 통해 DEV-UAT-PROD(개발, 테스트, 운영) 환경에 맞는 구성 정보 사용가능

- Private Git Repository : git (Local상태에서만도 사용가능, Remote 상태에서도 가능)
- Secure Vault : 암호화된 데이터
- Secure File Storage : 가지고 있는 로컬 파일
모두 사용가능
각 application.yml 파일의 우선순위
application.yml -> application-name.yml -> application-name-<profile>.yml
마이크로 서비스는 어떤 환경설정 파일을 사용할지 명시 가능
Local Git Repository
디렉토리 생성
git init
ecommerce.yml 파일 생성
git add, commit (commit 까지만 해서 local에 저장)
token:
  expiration_time: 86400000 # 토큰 지속 시간 (하루 24 * 60 * 60 * 1000)
  secret: user_token # 임의의 값

gateway:
  ip:
Spring Cloud Config Project 생성
Dependencies
- spring-cloud-config-server
@SpringBootApplication
@EnableConfigServer // config server 등록
public class ConfigServiceApplication {

    public static void main(String[] args) {
        SpringApplication.run(ConfigServiceApplication.class, args);
    }

}
application.yml
server:
  port: 8888

spring:
  application:
    name: config-service
  cloud:
    config:
      server:
        git:
          uri: file:///Users/jiseok/Documents/git-local-repo # file 프로토콜
실행 후 테스트
http://localhost:8888/ecommerce/default
Microservice에 적용
Users MicroService에서 config 연동
Dependencies 추가
- spring-cloud-starter-config
- spring-cloud-starter-bootstrap -> 최근 spring cloud 에서는 빠져 있어서 추가해줘야 함
(or yml 파일에 spring.cloud.bootstrap.enabled=true 해줘야함)
bootstrap.yml 추가 (application.yml 보다 우선순위 높음)
config 위치 (외부의 config 등록해줌)
spring:
  cloud:
    config:
      uri: http://127.0.0.1:8888
      name: ecommerce # repository 파일명
2.4 버전이후로는 bootstrap.yml 작성하지 않고 application.yml 파일에 작성가능 (spring-cloud-starter-bootstrap 추가할 필요 없음)
아래 블로그에 정리가 잘 되어있다.
https://multifrontgarden.tistory.com/278
spring:
  application:
    name: user-service
  # 2.4 이후로는 config 설정을 application.yml 파일에 설정
  cloud:
    config:
      name: ecommerce
  config:
    import: "optional:configserver:http://localhost:8888/user-service"
UserController.java
health_check 수정
@GetMapping("/health_check")
public String status() {
    return String.format("It's Working in User Service on Port"
            + ", port(local.server.port)=" + env.getProperty("local.server.port")
            + ", port(server.port)=" + env.getProperty("server.port")
            + ", token secret=" + env.getProperty("token.secret")
            + ", token expiration time=" + env.getProperty("token.expiration_time"));
}
실행 확인
config


configuration values 변경 방법
- 서버 재기동
- Actuator refresh
- Spring cloud bus 사용
Spring Boot Actuator
application 상태, 모니터링
Metric(지표, 수치) 수집을 위한 Http End point(beans, health, httptrace...) 제공
Dependencies 추가
- spring-boot-starter-actuator
모든 요청은 /autuator를 통해서 사용 -> /autuator/** 추가
    @Override
    protected void configure(HttpSecurity http) throws Exception {
        http.csrf().disable();
        http.authorizeRequests()
                .antMatchers("/autuator/**").permitAll()
                .antMatchers("/error/**").permitAll()
                .antMatchers("/**")
                .hasIpAddress("ip") // ip 변경 필요
                .and()
                .addFilter(getAuthenticationFilter());

        http.headers().frameOptions().disable();
    }
application.yml
management:
  endpoints:
    web:
      exposure:
        include: refresh, health, beans
# refresh는 config server에서 가져올 내용을 refresh 한다. (가장 중요)
/actuator/health 실행 확인

refresh는 post 방식으로 사용해야 한다.
ecommerce.yml 에서 값 변경 -> git add -> git comit -> post 방식으로 refresh
변경된 값 확인할 수 있다.
Spring Cloud Gateway에서 config 연동
Dedenpencies
- spring-cloud-starter-config
- spring-cloud-starter-bootstrap (2.4 버전이후로는 추가하지 않고 bootstrap.yml 작성안해도 application.yml 파일에 작성가능)
- spring-boot-starter-actuator
application.yml
spring:
  application:
    name: apigateway-service
  cloud:
    config:
      name: ecommerce
  config:
    import: optional:configserver:http://localhost:8888


        - id: user-service
          uri: lb://USER-SERVICE
          predicates:
            - Path=/user-service/actuator/**
            - Method=GET,POST
          filters:
            - RemoveRequestHeader=Cookie
            - RewritePath=/user-service/(?<segment>.*),/$\{segment}


management:
  endpoints:
    web:
      exposure:
        include: refresh, health, beans, trace
httptrace
클라이언트 요청이 들어와서 각각의 마이크로 서비스들의 호출되는 상태를 화면에 출력
ApigatewayServiceApplication.java 에서 Bean 등록
@Bean
public HttpTraceRepository httpTraceRepository(){
    return new InMemoryHttpTraceRepository();
}
Profiles 적용
각각 마이크로 서비스가 다른 설정을 사용한다고 했을 경우
application-name-<profile>.yml
- ecommerce-dev.yml
- ecommerce-uat.yml
- ecommerce-prod.yml
apigateway-service -> application.yml
spring:
  profiles:
    active: prod
user-service -> application.yml
spring:
  profiles:
    active: dev
각각 다른 설정 파일을 불러오기 때문에 ecommerce-dev.yml와 ecommerce-prod.yml의 token 값이 같지 않으면 권한 인증 오류 발생하게 된다.
테스트할때 인텔리제이에서 설정할 수도 있다.

Remote Git Repository
Git hub에 Repository 생성 후 사용하던 Local Repository를 Remote
config-service -> application.yml
server:
  port: 8888

spring:
  application:
    name: config-service
  cloud:
    config:
      server:
        git:
#          uri: file:///Users/jiseok/Documents/git-local-repo # file 프로토콜
          uri: https://github.com/jscheon/spring-cloud-config.git

          # private Repository 라면 id, pw 등록
#          username:
#          password:
등록 확인
- http://127.0.0.1:8888/ecommerce/default
- http://127.0.0.1:8888/ecommerce/dev -> default도 함께 표시
- http://127.0.0.1:8888/ecommerce/prod -> default도 함께 표시
Native File Repository
Git 에 저장하지 않고 Local File 에 저장하는 방법
config-service -> application.yml
server:
  port: 8888

spring:
  application:
    name: config-service
  profiles:
    active: native
  cloud:
    config:
      server:
        native:
          search-locations: file://${user.home}/Documents/local-repo
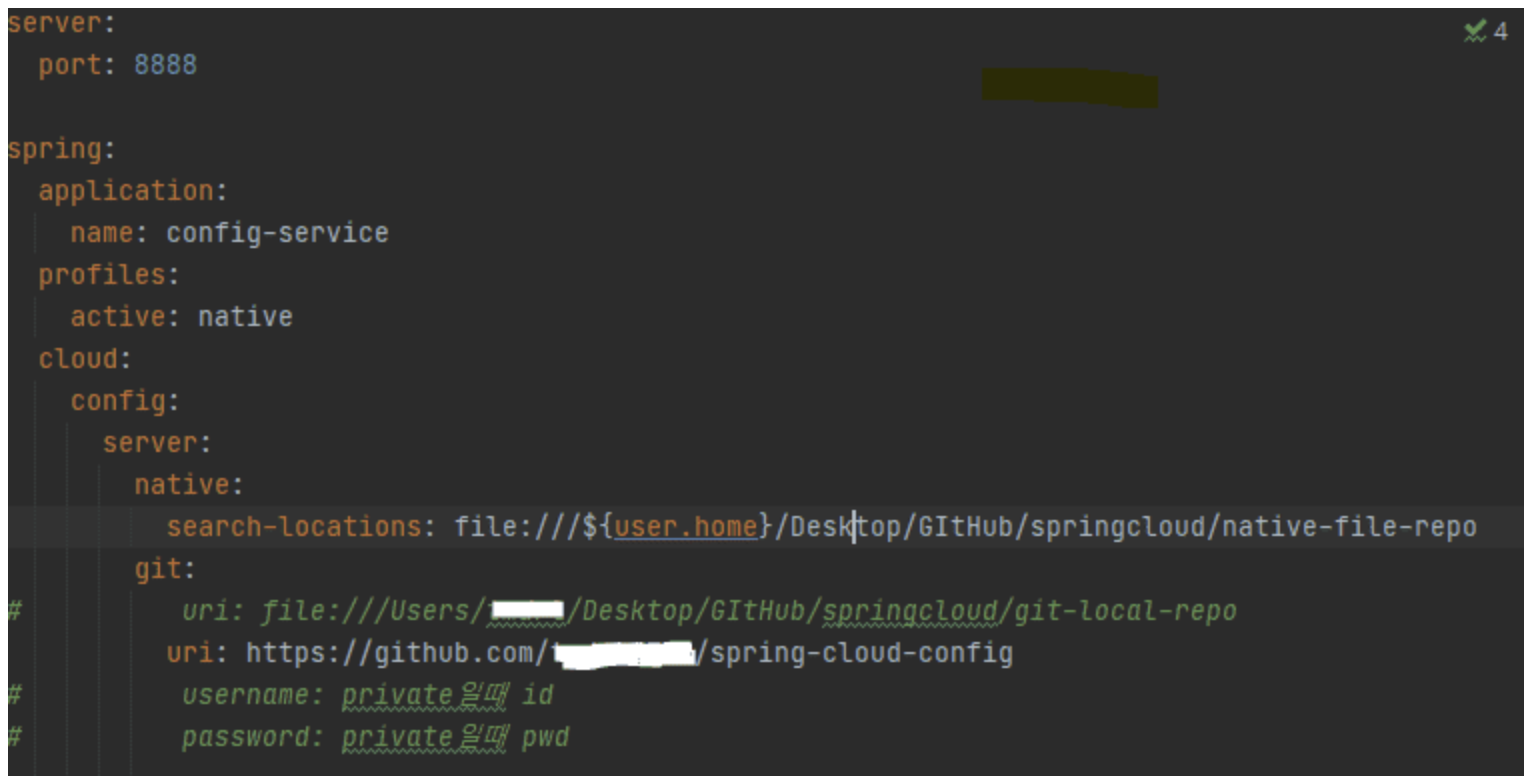
spring.profiles.active=native로 설정되어 있기 때문에, git은 무시된다. 만약 profiles.active를 지정하지 않게 되면, 기본값으로 git을 설정하게 되며, git.url이 없을 경우에는 오류를 발생한다.
'Spring > [인프런] Spring Cloud' 카테고리의 다른 글
| 설정 정보의 암호화 처리(Encryption, Decryption) (0) | 2022.06.27 |
|---|---|
| Spring Cloud Bus (0) | 2022.06.24 |
| Users Microsservice - Login (0) | 2022.06.20 |
| Catalogs, Orders Microservice (0) | 2022.06.19 |
| Users Microservice (0) | 2022.06.18 |